Studio 16 is the biggest community for visual artists in Alexandria
Egypt. Which now doubles as an art space and a place for people to take
art courses. The founders of this wonderful studio are Mahmoud Hisham
and Sameh Arafa. Mahmoud specializes in script writing and painting
while Sameh is a digital painter and a character designer.
Renderwow was honored to be one of the Sponsors for their
recent event. They host weekly events with a couple of professional
artists and sometimes more from all around Egypt. They call the event
“Get Pro”, for the students of fine arts and amateurs in visual arts.
This is to learn and get to know more about the work flow and the
obstacles that artists in Egypt must face and overcome, so they can
learn how to become professional artists themselves. From learning from
these professionals, they can gain experience out of personal and
professional life stories.
Instagram: https://instagram.com/studio16alex?utm_source=ig_profile_share&igshid=1x2mcfdciid1x
Facebook: https://www.facebook.com/Studio16alex/
2019年1月10日星期四

2018年12月19日星期三
The Role of V-Ray in Anti-Sawtooth Sampling and Coloring Sampling
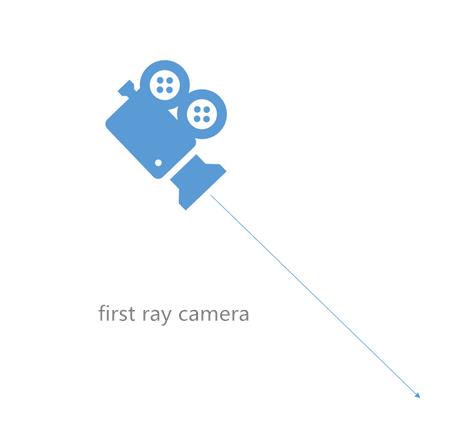
Anti-aliasing sampling, it is accomplished by the first ray emitted by the camera:
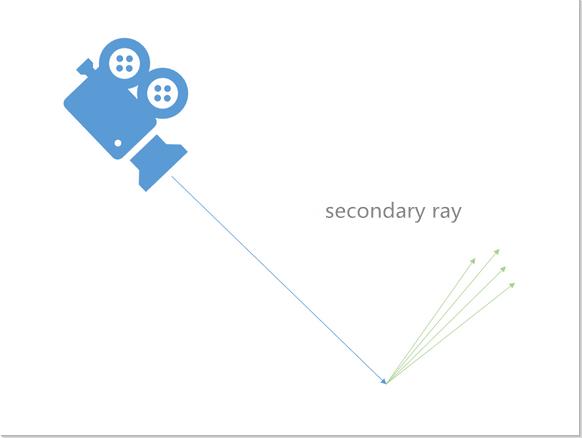
Colored sampling, influencing the colour of the material, it is accomplished by various types of secondary rays. Secondary rays are emitted from the intersection of the first ray and the model geometry. A first ray corresponds to one or more secondary rays.
So these two samples, each is useful:
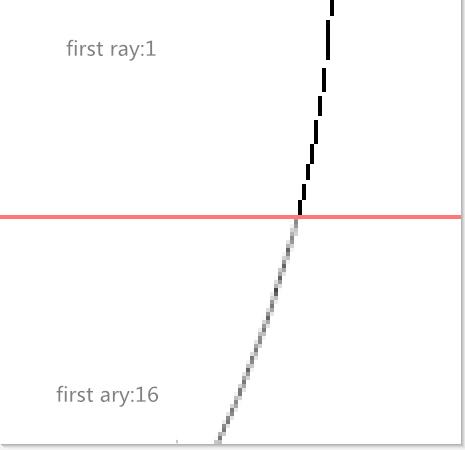
The more anti-aliasing sampling, there will be less noise on the edges of the geometry, on the thin line models, on the high frequency textures, on the depth of field, on motion blur, etc, the better the anti-aliasing quality of the image.
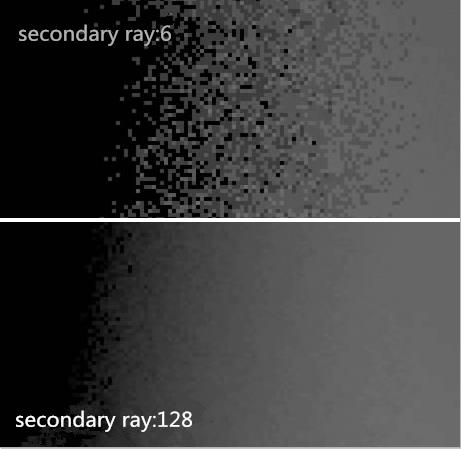
The more shading samples, soft shadow edge, material reflection blur, refraction blur, GI and other noise points will be less, the better the shading quality of the material.
So for different types of scenarios, our sampling focus is different.
If the scene is mainly represented by texture and lighting effects, so you have to increase the number of secondary rays. By contrast, anti-aliasing sampling does not need to be so high, most architectural renderings fall into this category.
If there is a lot of depth blur and motion blur in the scene, or there are lots of tiny models, such as hair , so anti-aliasing sampling should be focused, each of the first rays doesn't have to be followed by this many levels.
So how to control the anti-aliasing focus of v-ray samples and coloring samples during sampling? If it's a 2.x version of v-ray, you need to manually modify the subdivision of each light and material, this is a practical experience. if it's a 3.X version of v-ray, that's easy , 3ds Max users can just turn off "Use Local Subdivs" in the global DMC panel.
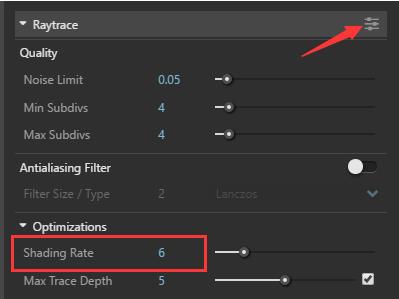
Then adjust Shading Rate:
SketchUp interface:
3ds Max interface:
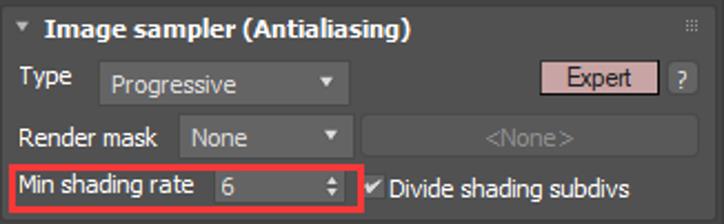
The default value officially recommended is 6, is applicable to most of the scene,high efficiency, The quality is good, you don't have to change it. If your scene clearly focuses on depth of field and motion blur, you need to change this value to 1 or 2. If you're still not satisfied with the quality of the shading of the scene, you can try to make this really big, such as 128, the sampling is going to focus on coloring, but at the same time, it will increase the rendering time accordingly, time won't be wasted, the picture quality will definitely improve, weigh your options.
Again,the default 6 applies to most scenarios, it's the balance between time and mass. so normally you don't have to change, Change may be self-defeating.
This article comes from:https://www.renderwow.com/views/news/newsview123.html
2018年12月5日星期三
Renderwow Supports Corona Renderer 2 For 3ds Max
Hello everyone,
Now Renderwow supports Corona Renderer 2 for 3ds Max
2018年11月5日星期一
Renderwow Client Version 16514 Has Now Been Released
【Cinema 4D】
1. Support Cinema4D R19
2. Fixed an issue where the download progress was incorrect after enabling rendering elements such as VRayDenoiser.
3. Fix the problem of changing the user and then clicking on the Renderwow client to open both Renderwow clients at the same time.
[3dsMax]
4. Support Anima plugin for AXYZ-design
5. Optimize the speed of submitting tasks and reduce the loss of efficiency that can result from reloading max files for too long.
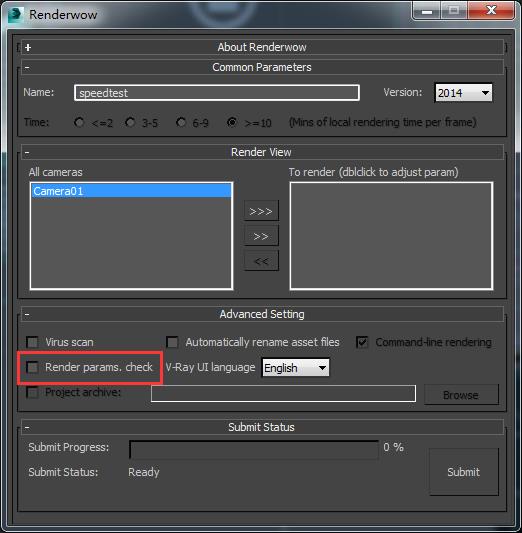
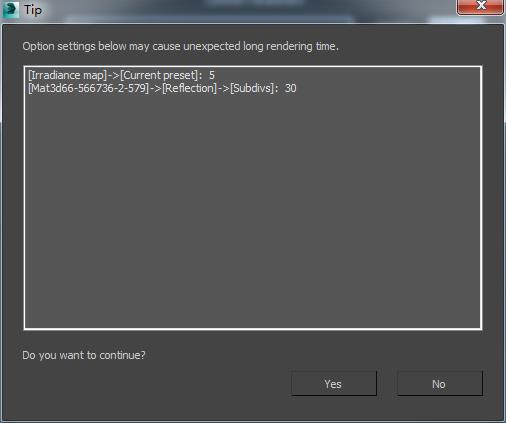
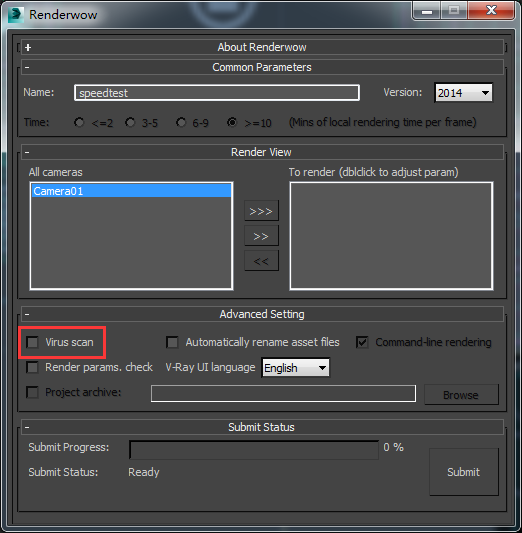
6. Add parameter detection function, you can choose whether to turn it on. Renderwow intelligently detects and gives hints to render, material, and lighting parameters, but allows the user to continue submitting, and the user can confirm whether there are improperly set parameters based on the reminder.
7. Increase the virus detection and antivirus function. Added anti-virus function before uploading the scene.
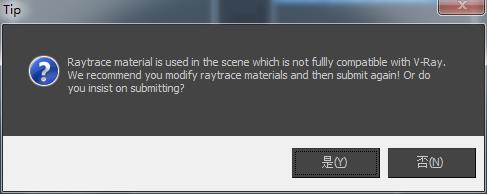
8. Increase the Raytrace material alarm. When rendering with VRay renderer, if there is a non VRay material (including raytrace material) it will easily cause 3ds max to crash thus hindering the image from being rendered. The Raytrace material popped up by the Renderwow plugin may cause the rendering to fail. You can also ignore the prompt to continue submitting.
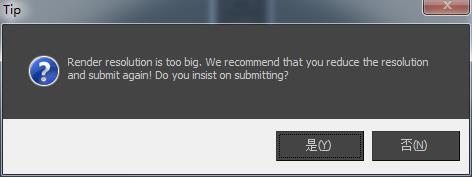
9. Increase the 3dsMax resolution setting too large. A resolution of more than 10000x10000 will give a hint to prevent the user from setting the resolution too large but allowing the user to continue submitting.
10.Fix 3dsMax plugin submission task progress display may be wrong
Update your Renderwow Client:https://www.renderwow.com/views/download.html
2018年10月25日星期四
3ds Max rendering Rendering Color Overflow How to Do
Friends who often use Lightscape or V-Ray to perform indoor performance,we often find objects in the scene that are more saturated in color than those in the same area. As a result of light transmission or photons rebound, the material overflow color is generated for other materials with low color saturation in the scene, finally, the effect diagram is distorted. Here is a brief summary of the common methods of overflowing color when using V-Ray rendering, let's share it with you.
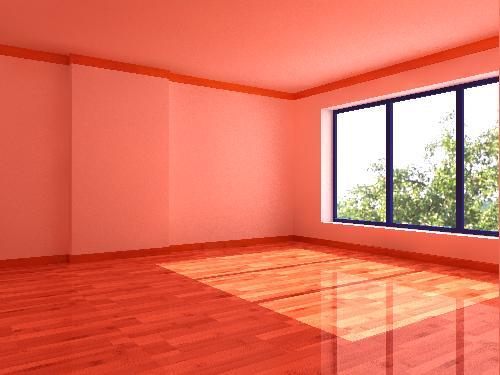
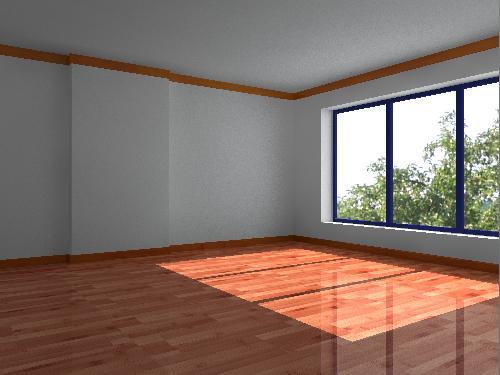
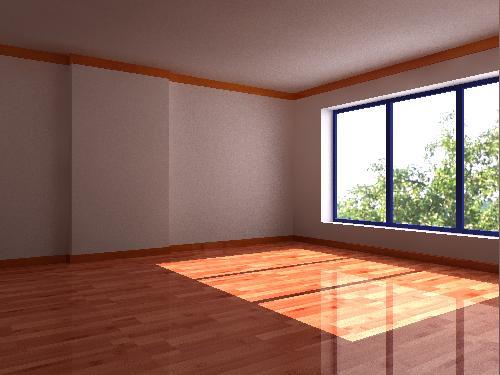
As shown above, in the scene, the floor belongs to a relatively large red solid wood flooring material, because its color saturation is relatively high. So in the process of photon rebound, photons carry the red color information of the floor and bombard other normal material surfaces such as white walls. Finally, the color of the white wall becomes reddish, this is not right.
Here are some solutions:
1. Wrapped material method: Turn the material of the floor into the VRayMtlWrapper of the V-Ray renderer, select "save old material as sub material" in the replacement material panel.
In the new material panel, just lower the Generate GI value. For example, turn it down to 0.4, this means that the photons rebound only 40% of the original value, the energy rebound of photons has decreased, the phenomenon of overflow is also reduced, but this sometimes affects the lighting level of the scene. Be careful to use and match lighting or exposure parameters to increase the brightness of the scene, the following is the solution at 0.4.
2. Cross boundary material law: This method also takes advantage of the VRayOverrideMtl material that comes with the V-Ray renderer, also save the sub material in the replacement material panel that pops up, I will not tell you here. After you save it, you will find that the original wood flooring material will be preserved as Base Material, all you need to do is copy it intact to GI material, and adjust the surface color of diffuse in GI material to the grey white without overflow, of course, the floor map should be removed.
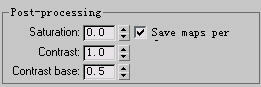
3. Rendering parameter method: This method is the simplest, all you need to do is reduce the Saturation in "Post-Processing" in the "Indirect Illumination (GI) Global Illumination Volume Display Bar in the rendering panel or set it directly to zero. This will directly seal all the color overshadows in V-Ray rendering.
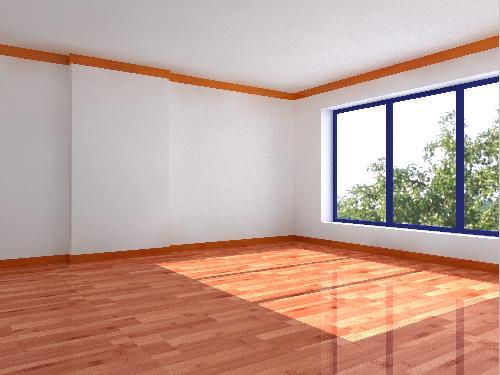
But the disadvantages of doing so are extreme, some of the materials in the scene are overblown and fair, be careful to use, reduce the rendering effect when Saturation is 0.
2018年10月12日星期五
rocket science: meet nate shaw, the cg supervisor behind the furry fan favorite
Rocket Raccoon is one of
the Marvel Cinematic Universe’s most unlikely heroes. The genetically modified
creature is an ill-tempered, poor-mannered and belligerent career criminal. But
over the course of Guardians of the Galaxy, Guardians
of the Galaxy Vol. 2, and Avengers: Infinity War,
and his relationships with Groot, Peter Quill, and Thor, he’s matured into
an altruistic fan favorite.
The
character’s success is down to his believable characterization, hints at a
traumatic past, Sean Gunn and Bradley Cooper’s performance capture — and the
fact that he looks and moves just like a real talking raccoon.
One
of the people behind Rocket is Nate Shaw, a CG supervisor at Method
Studios, which handled the character for Guardians of the Galaxy Vol. 2,
and Avengers:
Infinity War. Nate’s role was to oversee Rocket’s fur pipeline and
his fur shader in V-Ray.
We
caught up with Nate after his inspiring talk at Total Chaos to ask him about
working with the sweet rabbit.
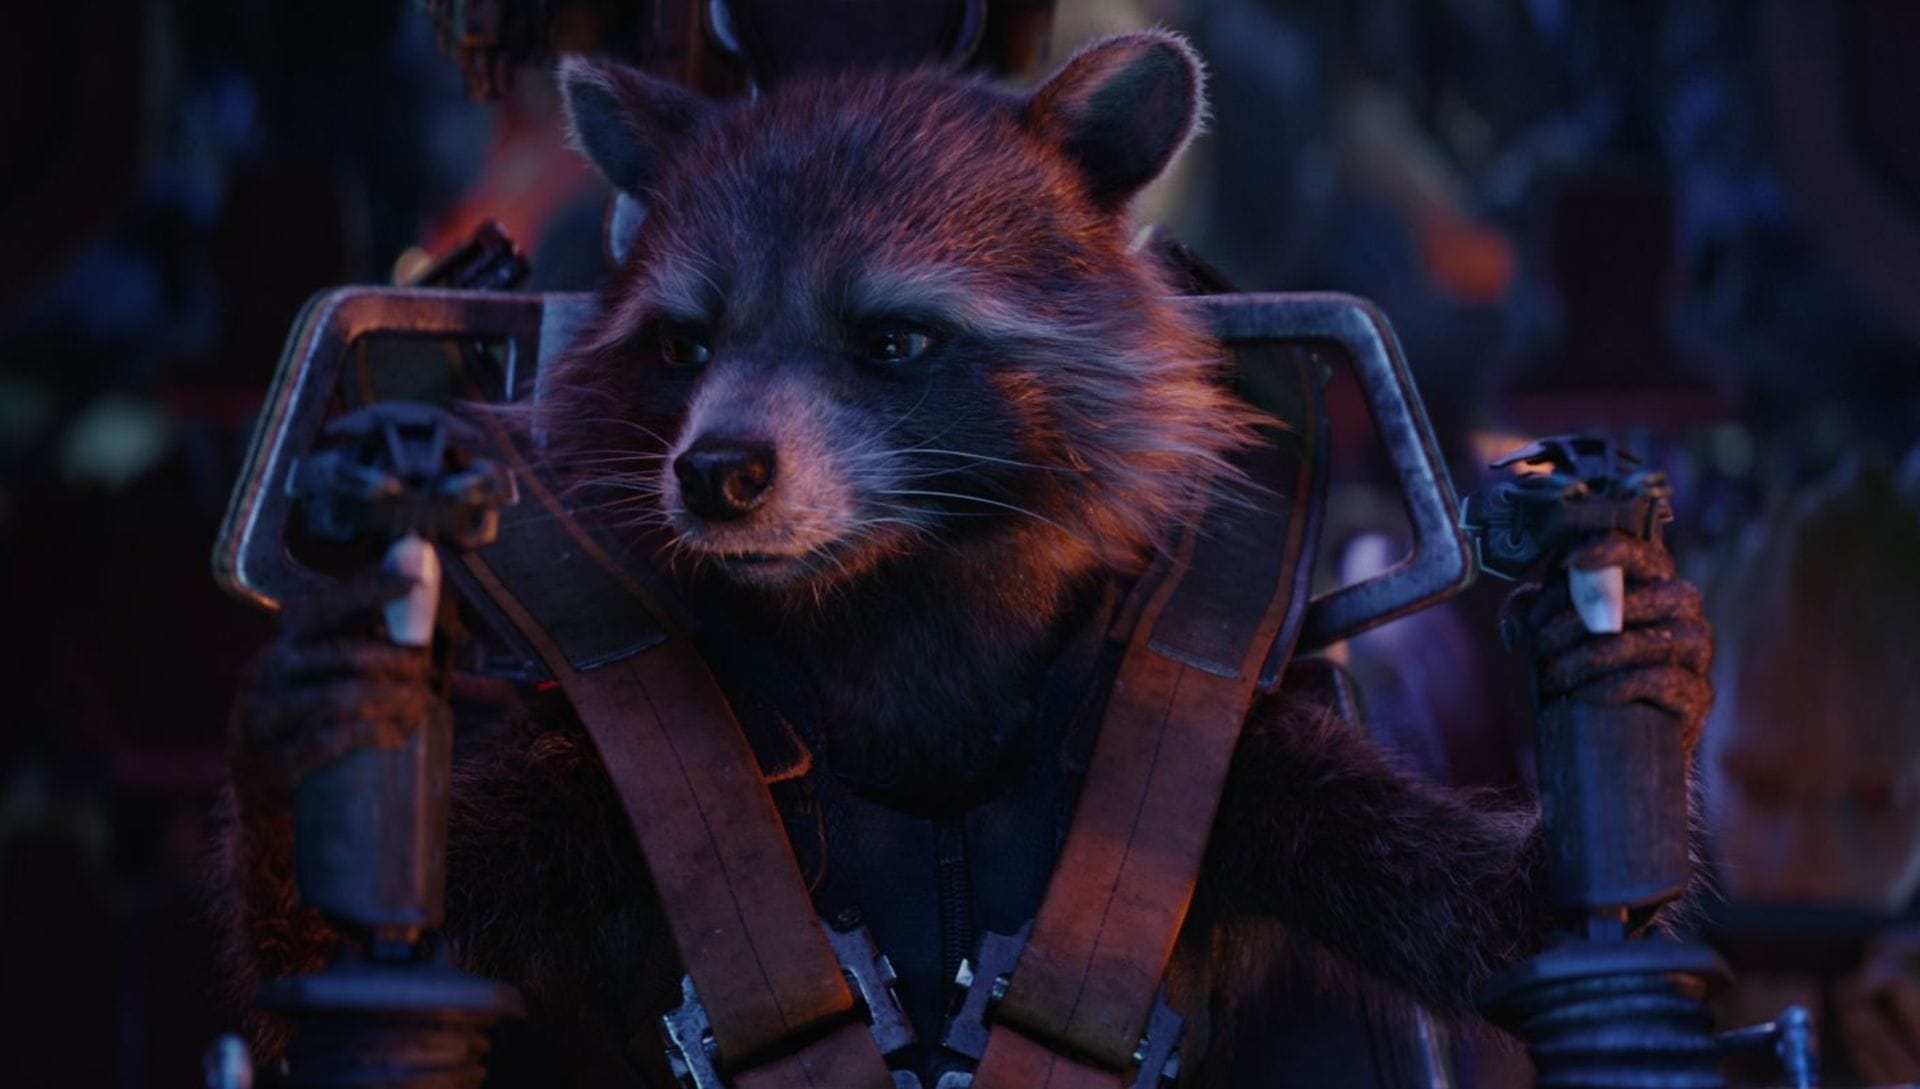
Were you excited to hear that you
would work with Rocket?
I actually did a groom of a CG dog on Divergent, which is a movie Method worked on years before Guardians of the Galaxy Vol. 2. It was a full CG shot, and I was working on that right when Guardians of the Galaxy came out. I remember looking at my dog, and comparing it to Framestore’s Rocket, and thinking: “That’s really inspiring. And dang, they’re good!”
I never thought that I would get that chance to then work on Rocket, and I learned a lot in the process. I can't take credit for it — a lot of people worked on it. But it was very exciting. I feel close to that character for sure. I spent so much time looking at him.
Do you have any Rocket Raccoon toys?
I don’t! I have a small apartment, so I try to avoid as many things as possible. But if I were to buy one, it would be Rocket.
Could you explain Method’s relationship with Framestore?
Framestore did the original asset for Guardians of the Galaxy, as well as the initial build for Guardians of the Galaxy Vol. 2, so they just sent us a lot of data. They sent us hair caches, which was every single hair. Then they sent us guide hairs, although that wasn't as useful as every single hair. They sent us texture maps, meshes for skin and suits, and they were really helpful. It was nice working with Framestore because we would get on calls with them, they were in London, and we were in LA, and we had a really good working relationship.
I actually did a groom of a CG dog on Divergent, which is a movie Method worked on years before Guardians of the Galaxy Vol. 2. It was a full CG shot, and I was working on that right when Guardians of the Galaxy came out. I remember looking at my dog, and comparing it to Framestore’s Rocket, and thinking: “That’s really inspiring. And dang, they’re good!”
I never thought that I would get that chance to then work on Rocket, and I learned a lot in the process. I can't take credit for it — a lot of people worked on it. But it was very exciting. I feel close to that character for sure. I spent so much time looking at him.
Do you have any Rocket Raccoon toys?
I don’t! I have a small apartment, so I try to avoid as many things as possible. But if I were to buy one, it would be Rocket.
Could you explain Method’s relationship with Framestore?
Framestore did the original asset for Guardians of the Galaxy, as well as the initial build for Guardians of the Galaxy Vol. 2, so they just sent us a lot of data. They sent us hair caches, which was every single hair. Then they sent us guide hairs, although that wasn't as useful as every single hair. They sent us texture maps, meshes for skin and suits, and they were really helpful. It was nice working with Framestore because we would get on calls with them, they were in London, and we were in LA, and we had a really good working relationship.
It
was so collaborative, even between studios, and they were very forthcoming with
any questions we had.
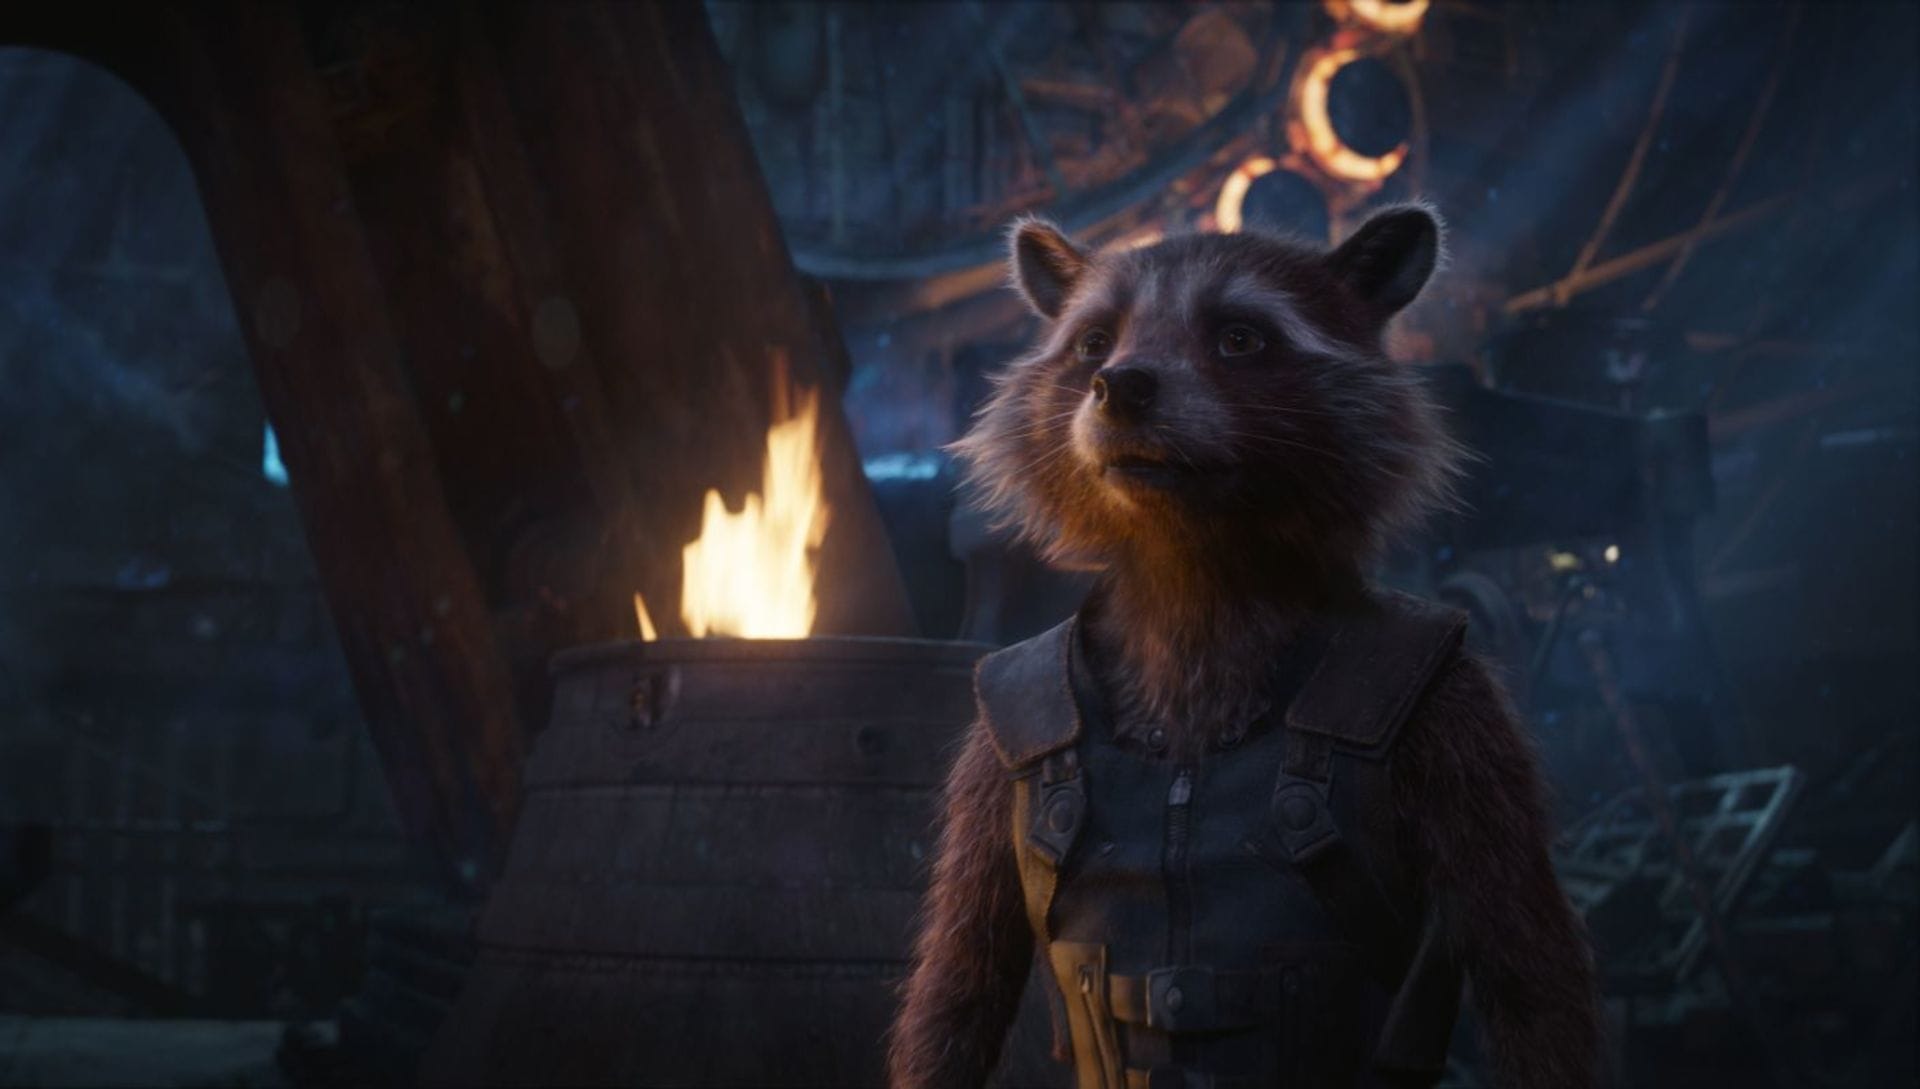
How did you make sure your Rocket
matched Framestore’s?
We had still frames from Framestore. They gave us their look dev environment which had all their geometry, the Maya file, and their poses for Rocket, so we would just put Rocket in there. Then render him for the same cameras, and go back and forth in Nuke until they looked identical.
Rocket’s movements are created from facial capture of Bradley Cooper, and motion reference of Sean Gunn. Do you have to do much hand animation on top this data?
For Rocket's performance, it was hand keyed, so it took a lot of animation time to do that. We had face shapes from Framestore, and then we just made our own if we needed extra blend shapes.
What was the biggest challenge?
On Guardians of the Galaxy Vol. 2, we had never done a furry creature that was this hero, this close-up. He needed to perform in such an emotive way, and be in so many shots. It was a volume of work that we had never done before, and it took us to the next level of challenges.
We had still frames from Framestore. They gave us their look dev environment which had all their geometry, the Maya file, and their poses for Rocket, so we would just put Rocket in there. Then render him for the same cameras, and go back and forth in Nuke until they looked identical.
Rocket’s movements are created from facial capture of Bradley Cooper, and motion reference of Sean Gunn. Do you have to do much hand animation on top this data?
For Rocket's performance, it was hand keyed, so it took a lot of animation time to do that. We had face shapes from Framestore, and then we just made our own if we needed extra blend shapes.
What was the biggest challenge?
On Guardians of the Galaxy Vol. 2, we had never done a furry creature that was this hero, this close-up. He needed to perform in such an emotive way, and be in so many shots. It was a volume of work that we had never done before, and it took us to the next level of challenges.
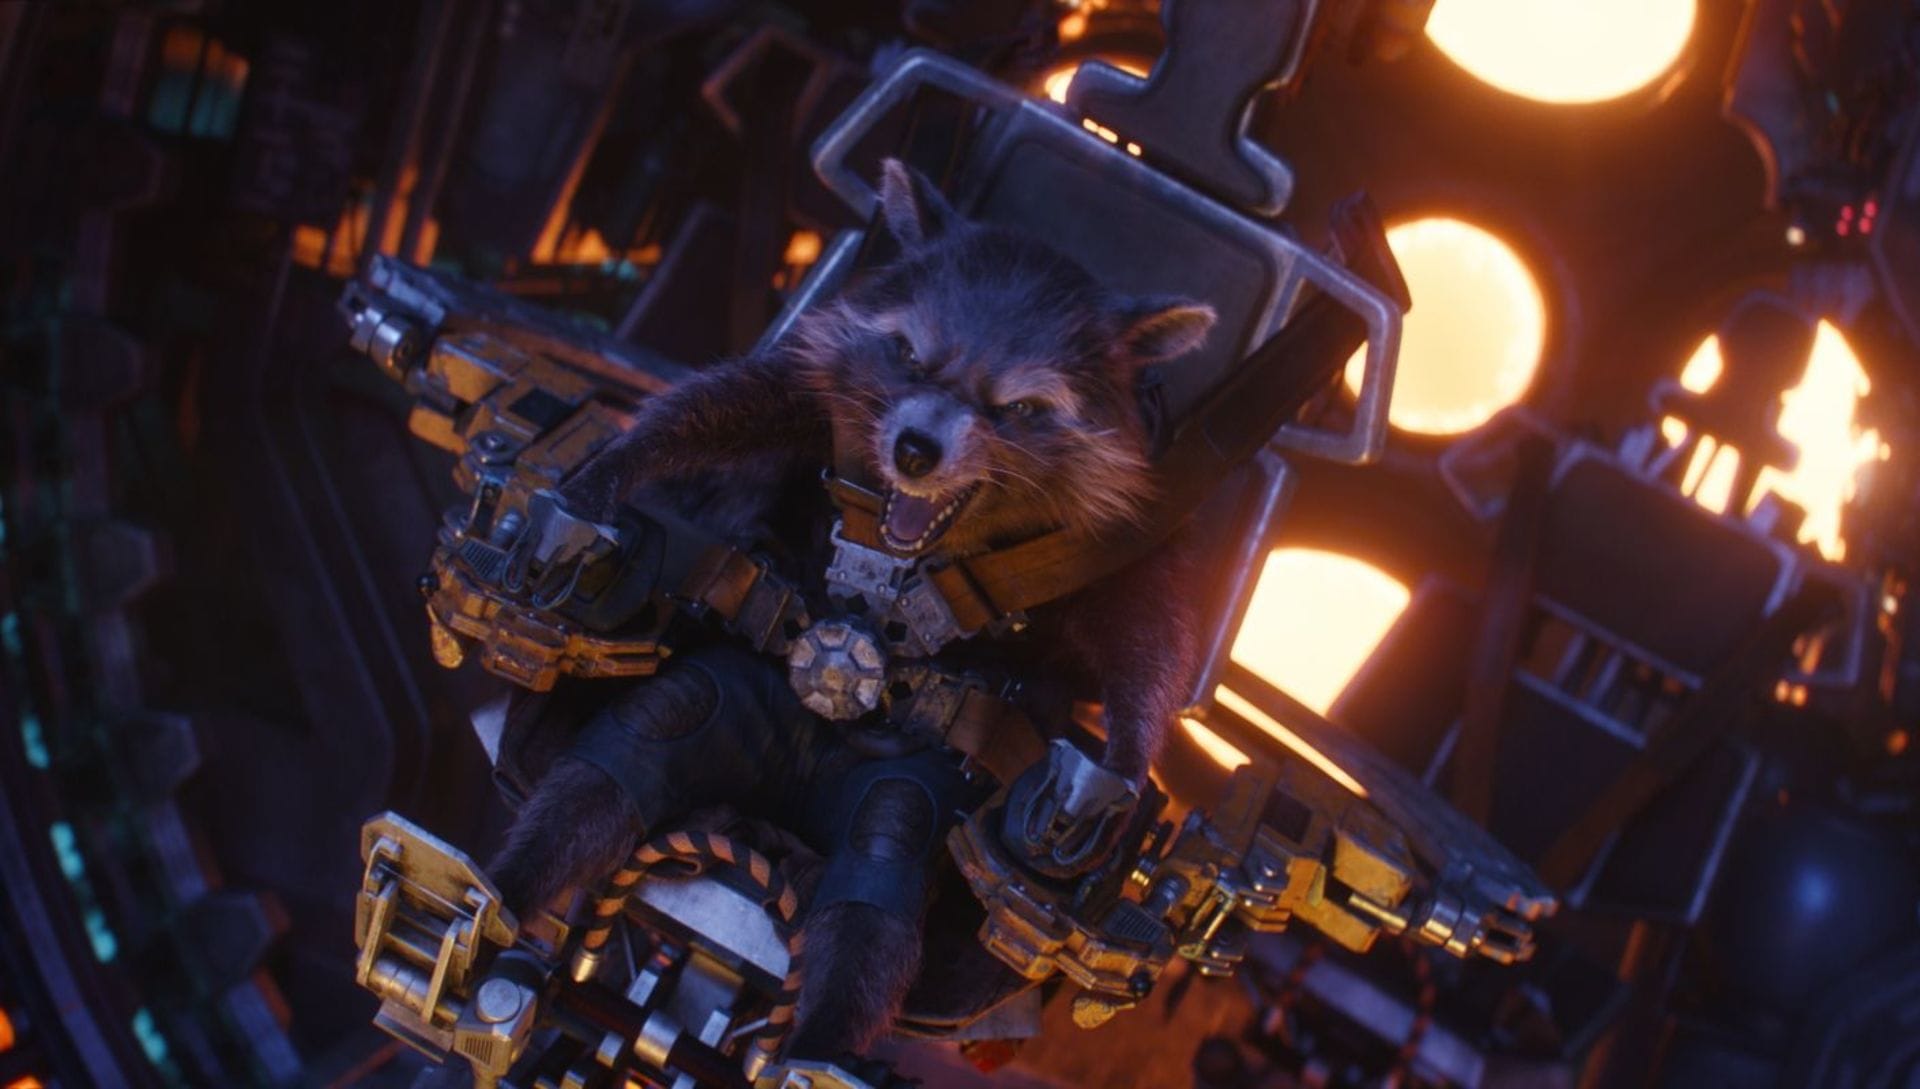
Could you explain how you
animated Rocket?
The animators work with Rocket as a mesh, and then they have a fur volume, which is a skin of Rocket, but replicating the dimensions of his hair. That's how they would animate and then they would publish the animation, hit a button, and export their animation to pass on to the next department who would create an Alembic. Our pipeline bases a lot of things on Alembic, especially downstream departments from animation. Even just the skin was an animated Alembic cache.
Then we would do that hair bind, and that would create hairs. On both movies that we had this post process to give the lighters this extra cache. In Guardians of the Galaxy Vol. 2, it was Alembics out of Houdini that went through a proxy. The second movie, Avengers: Infinity War, we would run it and do the bind in XGen, and that was VR scenes that were rendered and brought in. It was groomed whether we were using Houdini or XGen, it was never going into Maya — we skipped it and went straight to V-Ray.
Any grooming tips for aspiring CG hairdressers?
If you want to be a hair groomer, just look at real things. I develop a fixation on real-world objects, whether it's buildings in San Andreas, dogs for Divergent, or raccoons for Rocket. Dig in deep and look at reference as you work and you'll see things that didn't in the beginning. Eventually, you get to something that is photo real.
Did you use any specific V-Ray features here?
The great thing about V-Ray for Maya was the ability to use proxies. We weren't working with a fur procedural; we were working with every single hair. We had bound the hair in Houdini, and then we were caching it back out because we didn't want to re-groom the character. As we were working with every single strand of hair, it would crash Maya as soon as we tried to load up just one section of his hair. Because it never really needed to be in Maya, we could bypass that by using proxies.
The animators work with Rocket as a mesh, and then they have a fur volume, which is a skin of Rocket, but replicating the dimensions of his hair. That's how they would animate and then they would publish the animation, hit a button, and export their animation to pass on to the next department who would create an Alembic. Our pipeline bases a lot of things on Alembic, especially downstream departments from animation. Even just the skin was an animated Alembic cache.
Then we would do that hair bind, and that would create hairs. On both movies that we had this post process to give the lighters this extra cache. In Guardians of the Galaxy Vol. 2, it was Alembics out of Houdini that went through a proxy. The second movie, Avengers: Infinity War, we would run it and do the bind in XGen, and that was VR scenes that were rendered and brought in. It was groomed whether we were using Houdini or XGen, it was never going into Maya — we skipped it and went straight to V-Ray.
Any grooming tips for aspiring CG hairdressers?
If you want to be a hair groomer, just look at real things. I develop a fixation on real-world objects, whether it's buildings in San Andreas, dogs for Divergent, or raccoons for Rocket. Dig in deep and look at reference as you work and you'll see things that didn't in the beginning. Eventually, you get to something that is photo real.
Did you use any specific V-Ray features here?
The great thing about V-Ray for Maya was the ability to use proxies. We weren't working with a fur procedural; we were working with every single hair. We had bound the hair in Houdini, and then we were caching it back out because we didn't want to re-groom the character. As we were working with every single strand of hair, it would crash Maya as soon as we tried to load up just one section of his hair. Because it never really needed to be in Maya, we could bypass that by using proxies.
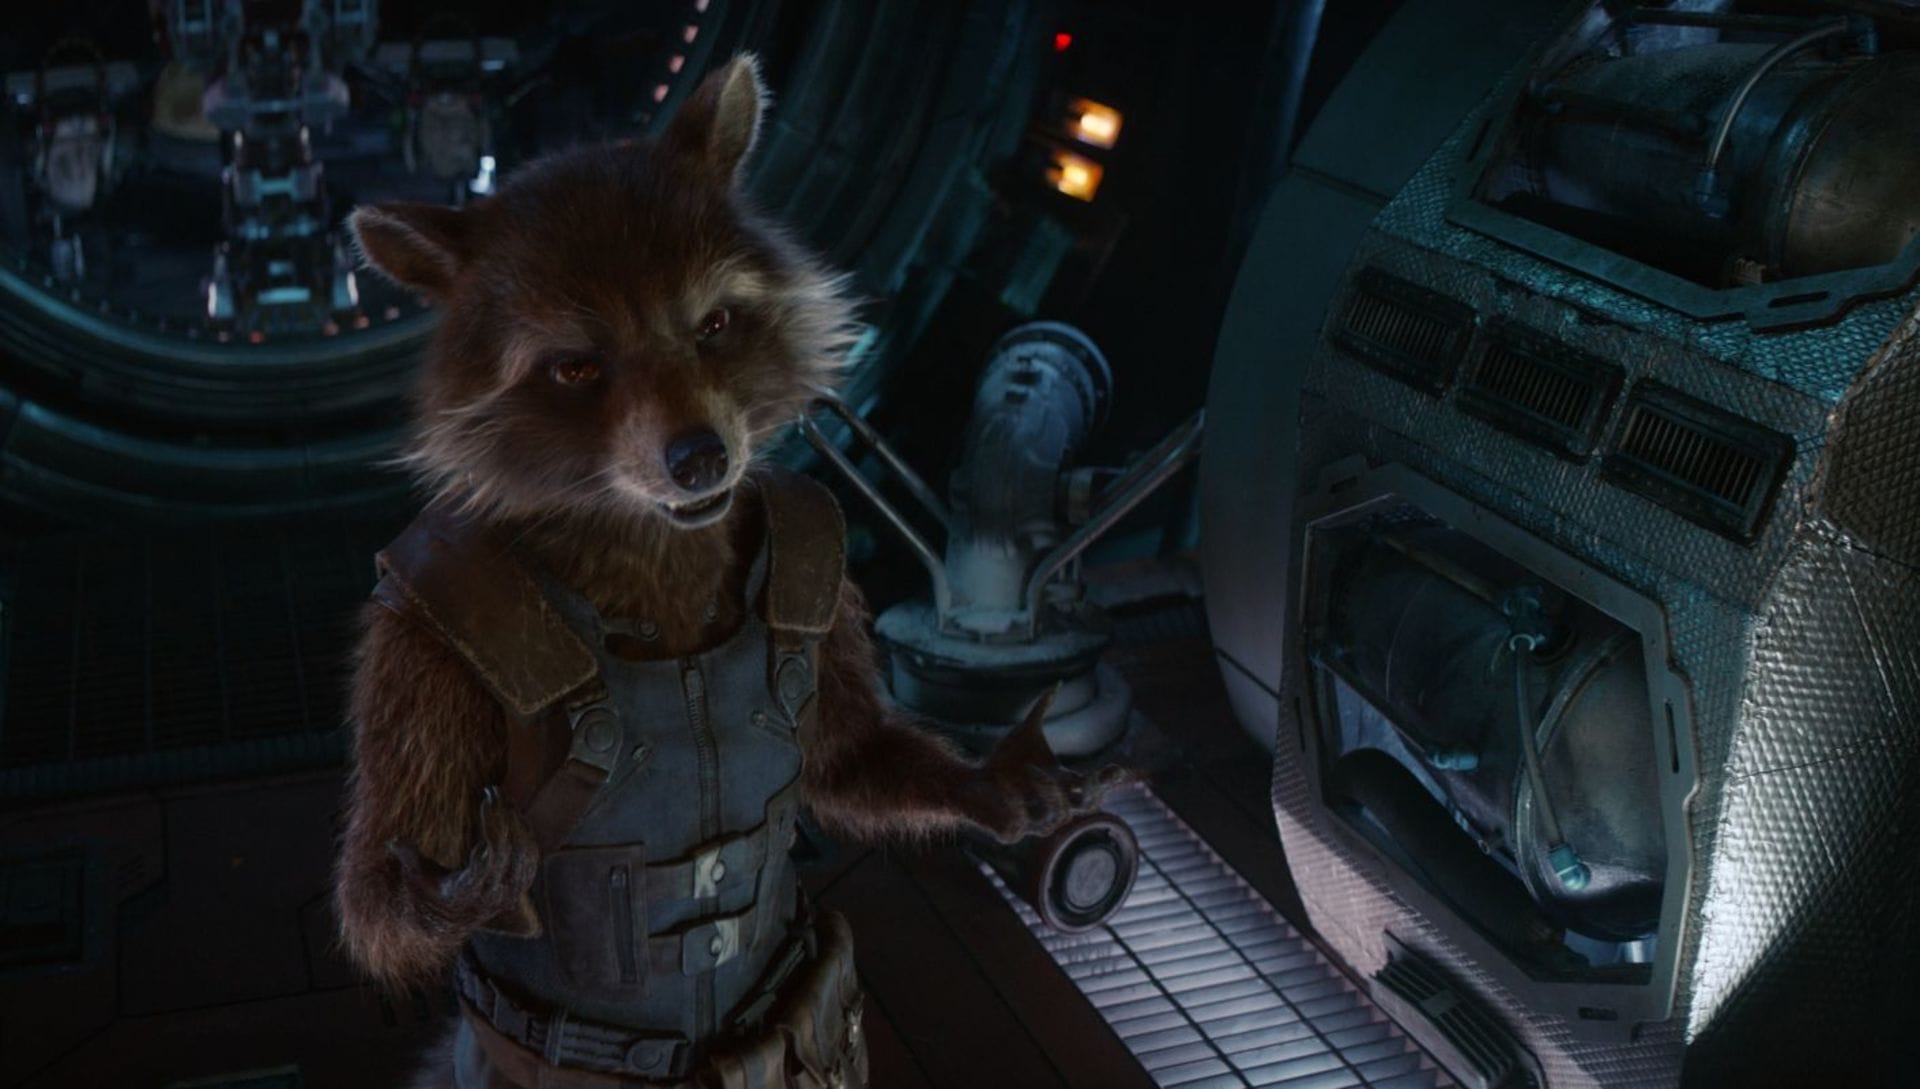
What kind of changes did you make
between Guardians
of the Galaxy Vol. 2 and Avengers: Infinity War?
Just minor changes. The asset was looking pretty good from Guardians of the Galaxy Vol. 2, but we changed some spec maps or spec responses on his hair, to add some glints. We added a percentage of hair that got more or less spec. We did some increase of some subsurface here and there of the nose, as well as improving displacements.
What did you think of Total Chaos?
Total Chaos was great. It was the first time I'd been to Bulgaria, and I would go back. Everyone was really friendly, and there were tons of great speakers.
Any particular highlights that you've seen?
One highlight was listening to a talk on machine learning, and how that can be used for render farm predictions, which is super techie and nerdy. It's not like the flashy Rocket Raccoon, but as a CG supervisor you're concerned with iteration time, and getting information to then bid on work or knowing how long's it going to take to render certain jobs. If we can use smarter technologies, rather than just doing the math, then I'm all for it.
Just minor changes. The asset was looking pretty good from Guardians of the Galaxy Vol. 2, but we changed some spec maps or spec responses on his hair, to add some glints. We added a percentage of hair that got more or less spec. We did some increase of some subsurface here and there of the nose, as well as improving displacements.
What did you think of Total Chaos?
Total Chaos was great. It was the first time I'd been to Bulgaria, and I would go back. Everyone was really friendly, and there were tons of great speakers.
Any particular highlights that you've seen?
One highlight was listening to a talk on machine learning, and how that can be used for render farm predictions, which is super techie and nerdy. It's not like the flashy Rocket Raccoon, but as a CG supervisor you're concerned with iteration time, and getting information to then bid on work or knowing how long's it going to take to render certain jobs. If we can use smarter technologies, rather than just doing the math, then I'm all for it.
2018年10月9日星期二
Three Factors Related to the Law of Motion in 3D Animation Production
Three-dimensional animation is different from 2D animation. The three-dimensional animation is the image of a two-dimensional planes, move the picture through motion. This is achieved according to the laws of motion. How does the motion law of objects come into being in three-dimensional animation?
1.Time required for action and number of frames
The total duration of a 3D animation is usually predetermined,and the number of seconds in each shot, will be produced according to needs, the length of the film occupied by each action is the time of a shot, long time, slow speed, the number of frames is large. On the contrary, the number of frames is small. Usually in 3D animation, the rhythm is fast, and the shot is short. So, it's going to be a little bit more frames and there may be hundreds of shots.
2.Motion amplitude and space design
The 3d animation production method needs to design the objects and characters in the picture well. The range of the action and the image must be properly handled. Take the hyperbole or simulation techniques, It depends on actual content and the needs. Combined with the perspective of the background picture, you can show different depth and distance effects.
3.Change of speed
The change of speed determines the smoothness of the picture, there are three types of exercise: Uniform speed, acceleration and deceleration. The distance between each moving object is the same as that of the picture, and it is uniform. The distance from small to large, the presentation of the results from the slow to fast, and the reverse is from fast to slow. Through the visual distance in the picture, and the adjustment of the speed of the object, create a sense of beauty in sports , give viewers a visual impact.
The above three points are the key factors of moving objects in 3D animation, the change of lens is inseparable from the setting of these parameters.
This article is from renderwow cloud rendering.
订阅:
博文 (Atom)